I'm either making things easier for myself by doing things in advance, or I'm secretly scared of having a boat and I'm putting off the inevitable. My official story is the former...
The preferred technique for achieving smooth fair curves with the hull's sides is to clamp the gunwales into place after wrapping the sides around the bulkheads. So before I can go 3D, I wanted my gunwales to be ready. I finally scarfed together the lumber stock I had previously ripped to size. However, the plans also call for the gunwales to be beveled. So while I have the lumber loose and handy, I ran it though my table saw with the blade set angled.
 |
| Looks just like Fig. 15 in the plans! |
Using my handy-dandy 33mm gauge, I had already marked the hull side. I also used it to the mark the gunwale too.
So, all I need to do is slap it al together, right? Except I've been pretty adamant about pre-coating all the panels prior to assembly and I haven't coated the hull sides yet. Why not? Because I've convinced myself that I want to glue the inwale spacers in place prior to coating the sides. It's either that, or 1) individually mask off where each of the spacers is supposed to go, or 2) don't coat the entire band where the spacers will go, or 3) coat the whole damn thing and glue the spacers to a coated panel. I don't like any of those choices and it's my boat and that's that.
Also, this plan of action allows me to stress out about EXACTLY where to put EVERY ONE of the THIRTY THREE spacers. Well, it's not crazy. They do all have to go somewhere, and will do so by my hand... I've decided to use the inwale spacers to mask the three bulkhead arms and the bootstrap that connects the side panels together. So I started my spacing process with those four points and then distributed the others as evenly as possible. And by evenly as possible, I mean using a calculator to divide the space. All this is entirely necessary, I assure you. Do not be fooled by other GIS builders who may assert otherwise.
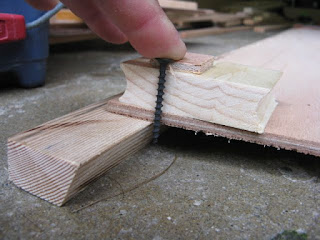
Another reason for doing it this way is related to another future (very future) step. One of the techniques for clamping the gunwale in place when it is being glued is to screw it down with sheet rock screws. What if I use the same screws for both the gunwale AND the spacers? Shown below is the stack of: cushioning pad, inwale spacer, hull side, gunwale.
Crazy like a fox, I say...
Or just crazy. My next step was to prepare 66 inwale spacers with pad and screw inserted just barely poking through. Then, when it comes time to glue, the "clamp" is ready to go. Assembly line time! 1) Reach down 2) Grab a pad, a screw, a spacer 3) Screw into pad 4) Place pad on spacer exactly 2.5 cm from the bottom edge of spacer (I'm not kidding...) 5) screw into spacer without fastening to work bench 6) throw assembly into finished pile 7) repeat 8) keep repeating...
After that, I had no other excuses so I mixed up some epoxy (no, wait, go get the oar that still needs gluing!) and spread a glop on each pad, then screwed them in carefully lining the bottom of each with my guide line and the center mark established above (with the calculator...). The remaining goop was used on the oar,seen below hiding under bricks.
The careful observer will notice that I omitted the spacers that will correspond with the bulkhead arm because that's going to take some notching and fitting after the bulkheads are in place. I also omitted the first and last spacers because the knees will take precedence there too.
After a few hours (my next post will discuss that period), I checked up on the spacers and took the opportunity to clean up the ooze while it was still workable. I've taken a liking to using a 1" chisel to pinch off the thickened bead and then scrape it away. Works like a charm if you catch it in time. If you head off to bed and come back in the morning, it will be too late. Don't ask how I know.
NOW I can coat the hull sides. Um, after I install the spacers to the other side that is...
I have a few more panels that need a final coat of epoxy, so I'll have some parts that can absorb any excess epoxy if the batches for the hull sides are too large. And THAT is all that stands between me and 3D. I think...


