Welcome statement


Welcome to my blog on the building and sailing of a Goat Island Skiff (GIS). Join us on the Michael Storer Wooden Boat Plans forum or on Facebook, where the community of Storer Boat builders, owners, and admirers share their ideas, experiences, and watery hi-jinx.

If you are new to this blog, start at the beginning by selecting the oldest date in the blog archive located in the left-hand column. Enjoy!

Saturday, April 30, 2011

Yard Work

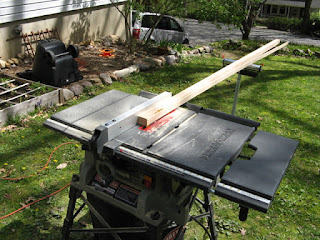
We had a glorious day today and I spent it working in my yard, working on my yard.  Yes, I pulled my power tools into my yard and commenced ripping and cutting the lumber for the upper spar, also known as a yard.  I found another nice piece of Douglas Fir at Home Depot, this time with no knots to speak of.  It’s actually an end cut, but the tree must have been fairly large diameter because the curvature of the rings is pretty flat.


If done properly, this 2 x 8 x 10’ board will yield all the cuts I need for a 12’ yard, since I’ve already resigned myself to the fact that scarf joints are inevitable.  
(By the way, my wife is the greatest for giving me a table saw as a gift a couple of years ago.)


My first cut was right up the middle.


The next cut is the width of the yard’s diameter.  Incidentally, I am omitting any specific dimensions--especially the precise smaller measurements--to safeguard the designer’s proprietary information.  If I do mention a measurement like 16 feet, you can rest assured that’s not the actual design specification.

The next cut is also the width of the yard, with only a sliver of fall off as a remainder.  These rings have more curvature, so I will minimize the amount of this stock that’s used.


Another center cut.  Notice how flat the grain is.  It’s not the tightest grain, but I’ve been able to approximate “quarter sawn” gain orientation, which is the most desirable.


There’s JUST barely enough lumber to yield four cuts the with of the yard.  Each one of those will then be turned on edge and get ripped down to half the yard’s diameter.


This is the result I’m going for.  I’m feeling good.  The sun is shining, birds are singing, everything is humming along.  And then...


I screwed up.  Somehow, I put the wrong end up on this piece.  The I cut right through “width” side.  Not only is the grain in the wrong orientation, but the resulting width dimension is a couple of millimeters less than what I was going for.  Believe me, these plans are spec’d to a tenth of a millimeter, so doing this was WAY off.  Well, maybe that’s blowing out of proportion, but at the time it seemed so disastrous that I made my next mistake...
The two “center cuts” were meant to form the majority of the length of the yard.  The two “end cuts” would BOTH be used to extend the length through a scarf joint.  I needed all four to get to the length of the yard.  After making the bad cut, took the remaining “end cut” and chopped it in half thinking it would provide for both extensions.  


Except it’s not long enough to do that.  There’s only enough length to make 3:1 scarf joints, which is nowhere near enough scarf. 

So I ended up using the “bad” cuts after all.  They will form stubby extensions at the ends of the yard.  I’ve marked the angles for the scarf joints, which will be 10:1, and the picture above shows how the collection of joints will be offset over the length of the yard.
I didn’t cut the angles for the scarf joints yet, just in case I read on the Storer Forum that I should just reduce the length of the yard by 6”.  I doubt that’s going be the recommendation though.  The stubby ends are also slightly narrower than the other pieces.  This is ok (which I should have realized when I discovered the mistake) because the yard gets tapered at both ends, far more than the few millimeters difference in the cuts.
The moral of the story is: don’t get distracted by blue sky and sunshine when operating power tools.  Bluebirds aren’t gonna sail your boat for you, so tell them to take a hike and then focus on the lumber!


Sunday, April 24, 2011

Wood curls fly!


Well, I’ve dipped my toe in the water; I made my first cuts and did some gluing too.

As noted above, I brought home a decent piece of Fir—a 2 x 8 x 14’ board.  First lesson: bring the metric tape measure with me instead of doing mm -> ft conversion in my head.  For some reason I thought I only needed 9 ft of wood, not 11.6 ft.  So I bought a board that had about 9+ ft of clear straight grain for about half its width.  Once home, I realized what I did and figured out how to get additional good wood from the rest of the board by scarffing bits together.  Several rips and cross cuts later, I ended up with two 9’ halves of a boom, and two extension pieces too.


What’s left over will be used for the tiller and for other projects around the house (utility shelves, etc.):


So, it became time to learn to scarf.  I figured I’ll have to do some scarfs during this build anyway, so better start getting used to it early.  I went about 20:1.  I did a rough cut with the table saw, then used a coarse grit belt sander, then broke out the plane.  I haven’t drawn a plane over wood in about 40 years, and I was a young boy when I did.  So that was an interesting re-learning experience. 


I was not perfect, but I believe the rounding of the spar will eliminate the worst of the errors.  The next photo is oriented with the mating surface of this half of the spar facing upward.  The side resting on the table will become the outer diameter of the boom.


Proof that I did indeed plane.  It’s a pretty satisfying feeling when the technique is done right.


Time for glue.  I got my epoxy supplies from Duckworks Boat Builders Supply (the agent that sold me the GIS plans and the source of my sail’s Dacron).  They sell System Three products and I decided to go top shelf with the epoxy.  System Three’s Gel Magic is specifically designed for joining, laminating, and other adhesive applications.  It comes in bulk bottles of course (which I did purchase), but it also comes in tubes that accept a mixing applicator tip.  Although it’s more expensive per ounce, it also helps cut down on waste.  But then the mixing tip costs money too, so it’s hard to say if there are any efficiency gains or is it just a matter of convenience.  For the small amount of epoxy needed to join these two scarves, it was a good way to go.


I did dry runs of the clamping before squeezing out the goo, which is what is shown here.  I didn’t bother taking a shot after applying the epoxy, since it looked pretty much the same.


It was raining on and off today and we’re just coming off a rainy weekend, so I don’t expect these joins to be cured overnight.  But sometime during the week I will join these two halves together (the scarfs will go to opposite ends) and create a square section hunk o’ wood destined to become a GIS boom.  Or I might hold off until I have other gluing to do and then hand mix the batches needed.

So I can now officially say, “I’m building a boat!”

Start at the Beginning

[Editorial note:  This first post is about a week late.  It originally appeared in the Michael Storer Wooden Boat Plans Forum on April 20, 2011.  My next post will summarize what was learned from that discussion and how I proceeded]

It’s time to begin building a Goat Island Skiff!

I’ve started by making my own sail (not yet complete as I write this) which is detailed in my other blog.  But warm weather is coming, so I'd better get started with the boat part of the sailboat.  I recently ordered and received a bunch of System Three Epoxy (from Duckworks Boat Builders Supply).  So it’s time for me to get some wood and start the butchery!

I will tackle making the mast and spars first.  My motive is to have the spars done as soon as possible, measure how much they flex, and then finish the sail’s head and foot to match.  The plans call for Douglas Fir lumber and that’s readily available in the US northeast, although I’m not sure yet how easy it will be to find tight clear stock in the lengths required.

Michael Storer, the designer, has updated his plans to feature a hollow, box-sectioned mast that is as strong as his original solid round pole but at at 55% of the weight.  I plan to rip the mast staves (the individuals sides) from 2x4 stock, getting the wide staves from one board and the narrow staves from another.  The remnant from the narrow stave board should also provide material for other parts, inwale spacers maybe?  It’s not the Western Red Cedar spec’d for the spacers, and the widest dimension is a little smaller than called for, but I’ve seen enough variation from other members to feel comfortable doing that.  Below is a layout of the cuts I plan to make.

I'm also considering trying to squeeze the yard and the boom (or spars) out of a 2x4 board.  The 1 ½” finished dimension is less than the diameter of the spars by about 2-3mm.  However, I’m inclined rip two halves of each spar and laminate them with alternating grain to fight warping.  With that in mind, I should probably just cut the long edge of each half spar(s) from the long side of the board and keep the plan’s dimension to the millimeter.