I've tapered my second version of the yard and kept track of the bend measurements. Much as I believed, this one is stiffer (and heavier) and held up tot he shaping better. I'll radius the corners rather than rounding it off fully, partially because I don't want it to get too bendy and partially for the aesthetics. The mast will be square with radiused edges and I think matching spars will look good. Finally, I found another nice Doug Fir 2x8 (x10') that I think will yield a quality boom.
My mast is 75% constructed. Both narrow staves are shaped and connected by spacers. One wide stave is glued up.
I'll post pics and more commentary soon...
Tuesday, May 31, 2011
Wednesday, May 18, 2011
A New Goat Launching
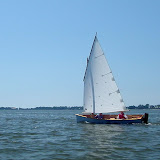
Simon in Florida recently splashed his almost-completed Goat Island Skiff this week. What a beautiful boat with fantrastic custom detailing and a fascinating radial cut Lug sail!
This is my first post using a link from Picasa (Simon's album), so I'm curious what shows up on my blog. My intent is that any of my visitors can easily jump to his photo album because his pics are fantastic.
Ok, so click on the photo above and check out Simon's Goat, which does not yet seem to have a name...
Monday, May 16, 2011
Spar-o-palooza
Work continues on my spars. In my May 8 post, I left off with my mast staves being joined to reach their full 16ft length. Those joints came out good and I proceeded to laminate the halves of the yard and the boom to create the square section blanks that will then get shaped.

I wasn’t shy with the quantity of epoxy, but it was hard to get an even amount of squeeze out over the 12ft of length.

One of the main reasons for constructing the spars first was to determine the amount of bend they will exhibit and use that data to complete the sail’s final two edges. Other GIS builders have been pooling their data and the standard that has been settled on is to support the spar at its ends and hang 10kg (~22 lbs.) from the center.

Since the blanks have a seam up the center and the grain is oriented parallel with the seam, I was expecting the blanks to be stronger on that axis. Turns out, all four sides have different amounts of flex, and both blanks were different from each other.
So I made a chart to track all the measurements. As of this writing, I progressed with the yard blank from raw to tapered with the following results:
(Side A & C are the ones with the seams, B & D are perpendicular to the grain and the seam)
All four sides raw:
A: 35mm; B: 27mm; C: 32mm; D: 31mm
Then I read another method used by Dabbler Sails wherein one hangs 1/3 of the square foot area of the sail in pounds from the point where the halyard attaches. In my case that would be 35 lbs. The measurements are taken at the 1/4, 1/2, 3/4 marks.
All four sides raw:
A: 38-49-31; B: 30-42-27; C: 34-42-31; D: 31-43-29
Sides A & C tapered, (B & D raw):
A: 41-57-37; B: 32-45-30; C: 40-59-38; D: 35-49-32
All four sides tapered:
A: 44-64-42; B: 41-58-40; C: 44-64-43; D: 43-62-43
So I think I may have gone too far with this blank. I didn’t want flex in excess of 50-55mm. It’s certain that I will get even more flex after rounding off the corners into a fully circular cross-section. It’s interesting that each side flexes differently, even the opposing sides which are on the same axis. I guess when one side is in tension, the opposite side is in compression, so that variety of the grain will act differently... Meanwhile, the raw sides increased in flex when the perpendicular sides lost material. And when the final two side got tapered, the first two increased in flex again.
So after two pounds of shavings, I may have made a spar for a (smaller) future boat, or possibly parts for a Yawl rig for this one. But as of now, I am pulling the plug on this particular blank and will use the other heavier stiffer blank. Which means I'll have to start from scratch with my boom...

Next up: mast making.
Wednesday, May 11, 2011
A New Goat Launching
Simon in Florida recently splashed his almost-completed Goat Island Skiff this week. What a beautiful boat with excellent custom detailing and a fascinating radial-cut Lug sail!
This is my first post using a link from Picasa (Simon's album), so I'm curious what shows up on my blog. My intent is that any of my visitors can easily jump to his photo album because his pics are fantastic.
Ok, so click on the photo above and check out Simon's Goat, which does not yet seem to have a name...
Sunday, May 8, 2011
How NOT to scarf a joint
Well, things did not go as smoothly as I had projected in my previous post. I planed the mast staves for their scarf joints. For some reason, I did each half of the joint separately, rather than stacking the two halves to plane them together. The mating was questionable. That is to say, a reasonable person might have questioned how well the halves mated, but I chose not to question myself. I then proceeded to employ the “gravity clamp” method wherein one places a flat heavy object on the joint as it rests on a flat surface. I have bricks and a garage floor... what could go wrong?

Well, gravity can decide not to pull very strongly on my bricks for one thing. Basically all the joints on the pine staves were wack. That’s not a nautical term, that’s a physics term. A couple were so-so, which--in the big picture of things--is wack. Here are just a couple examples of what wack looks like:


However, the four joints of the yard (Douglas Fir) came out good. Good enough anyway.
So I proceeded to undo the wackness. Thankfully, there’s enough excess length in these boards that I can afford to cut out the “joints” and start afresh. The narrow staves are narrow enough to cut with my table saw (yay again). I created a guide cut to a 10 degree angle and ran each stave through on either side of the joint.


After the first cut, I realized that I should orient the angle differently to prevent a wedge of pressure against the guide.

10 degrees is very close to the 10:1 ratio I had previously used, both of which are overkill compared to the 8:1 often recommended.

In theory, two cuts from the same set-up should fit together nicely. For the most part, the cuts went well. Not quite as picture perfect as the sample above (which is why there are not any pictures...).
Sadly, the wide staves are too wide to fit through the saw blade on edge. I thought about it pretty hard and was going to create a crazy scheme of rotating the blade to 45 degrees and feeding the staves through at another angle... none of that was feasible and I eventually realized that I should step away from the saw.
Belt sander to the rescue! Being out doors, I was not afraid to create plenty of dust. So I stacked the wide staves, marked the angle to achieve, loaded a coarse 80-grit belt, and wailed on it.

I’ve read and paid attention to the boat designer’s explanation of how epoxy bonds to wood. HIs recommendation is to plane the mating surfaces whenever possible to cleanly cut the microscopic “tubules” into which the epoxy flows. Sanding leaves the tubules ragged and epoxy doesn’t flow into them as well. So I finished off the job with my plane.

I lied, there are pictures of the not quite picture perfect cuts. However, the slight gap will be filled easily by the epoxy goo.


Besides the weak gravitational pull on my bricks, another reason my joints were wack is that my garage floor is... you guessed it: wack. So this time I'm elevating things to a new level. Using two supports on the ends and a work table or two in the middle, my staves are clamped up and set to cure for the night. THEN I’ll be able to taper, assemble, round, etc. like I said in the last post...

Thursday, May 5, 2011
shaving sticks
No photos right now, but I'm progressing with the various spars.
My yard pieces are all bevelled for the scarf joints. I really got into the grrove with my plane and made quick work of the rough angle I cut with a table saw. Although the forum discussion consensus is that the full lenth in the plans is not so critical, it's possible that could make a difference in how far I can stretch the head of the sail. Since I don't know how my Dacron will react, I'll play it safe by building the full length yard and that means scarfing a small extension on the ends.
My mast staves are now shaved clean of the "rails" I left in place. I started by planing, but that was super tedious and I had about 64 liner feet of rails to remove. After doing one 6-foot board with a plane, I set up the table saw and knocked the rest out in no time. Yay table saw, again.
I have six scarf joints to make for the mast, which means twelve bevels of thin but wide staves. Once that's done, I'll be ready to glue all the scarfs. Then taper the mast staves... then assemble the parts into their respective spars... then taper the yard and boom... and so on...
Sunday, May 1, 2011
Malus Pinus Radiata
My other wood butchery project yesterday was to cut the lumber for the mast. The original design plans for the Goat Island Skiff called for making a solid pole not unlike the two spars. After some years, Storer sat down and worked out a design for a hollow box section mast that is just as strong but weighs 45% less. It too incorporates a tapered design, as much for the aesthetics as the weight reduction.
Each side of the box is to be made of a fairly thin plank. Thin enough that no lumber supplier carries that dimension (less than 1/2” thick) on the shelf. It is assumed that one can have one’s lumber planed--or thicknessed--to the appropriate dimension. And if one is working with a reputable lumber yard that carries fine quality wood, the assumption is valid. Just add money and anything is achievable. Of yeah, did I mention that the plan specifies Douglas Fir for the mast? and that its finished length is around 16 feet?
Since I’m shopping from the aisles of a national big box chain of home centers, I had to be a little creative. A discussion on the Storer Forum (started by a different builder doing the same parts) revolved around the use of Radiata Pine for the Goat’s spars. Long story short, it was agreed that the mast’s robust design could compensate for the material’s properties, provided the Radiata was clear and tight. Radiata is very abundant these days and is milled into very very clean 1-by dimensions (e.g. 1x3, 1x4, 1x6). To those unfamiliar with lumber sizes, 1x4 is actually the measurement of the raw plank which when finished on all four sides becomes 3/4” x 3 1/2”.
Thankfully, the dimensions of the mast fit nicely within the stock board widths; only small amount of trimming is needed.

You’ll note in the photo above that I selected boards cut from the edges of the log as opposed to a center cut. I feel this will match the stresses of the mast to the tree’s original stresses. I these board try to warp, they will bow the mast’s diameter, but may still remain straight from top to bottom.
A bigger challenge was finding the right combinations to equal a 16-foot length, since the 1-by lumber comes in a maximum of 10 feet. Plus, it’s not particularly cheap, so I want to minimize waste. Here you’ll see a combination of 10- and 8-foot lengths of 1x4 and 1x3s respectively that will form the wide and narrow sides of the mast.

I would rather stagger the joints even more than shown here, but to do so will require adding more joints elsewhere. They say that a well executed epoxy joint is stronger than the surrounding wood...
The biggest challenge of all was/is getting the thickness of the boards down to spec. The “school solution” is to use (or pay someone to use) a planer or thicknesser. I actually considered buying one, but they are over $200 and I really don’t see needed one in the future. A router table on the other hand...
So I have a new router table which will serve this project--and the family in general--very well. My silly thought was to simply run the stock over a wide flat bit in several passes. I picked up a 3/4” bit and proceeded to work from the edges inward. And that when it hit me... Um, what would I do to support the plank when the last of the material is being removed? I don’t have jig or a shim to hold the work piece up at exactly the right height (something like 5.5mm) for the final pass. So the solution was to not make that final pass.

I removed as much material as I could without having the work piece collapse onto the router bit (which protrudes upward from underneath the table). Next, I will use a plane, or a saw, or a beaver looking for work, to trim off these remaining “rails” and leave me with the proper dimensions.
In truth, I could have--and possibly should have--altered the plan’s dimensions to accommodate the 3/4” boards and still retain the exterior dimensions of the finished mast. Or I could have slapped the boards together to create a mast of larger width and then alter the rest of the build to accommodate the custom sized mast. And I did consider both courses of action. But a big part of the pleasure I get from projects like this is the problem solving, even if the problem is self-induced (I got myself into it, I’ll get myself out of it!).
So that’s where I’m at as of this writing. I need to cut scarf joint angles in all these boards (including the ones from the previous post, Yard Work) to get the correct lengths. Then they must all be assembled into their raw spar form. Then they will have be shaped. Then... the list goes on...
L8tr!
Subscribe to:
Posts (Atom)