Welcome statement


Welcome to my blog on the building and sailing of a Goat Island Skiff (GIS). Join us on the Michael Storer Wooden Boat Plans forum or on Facebook, where the community of Storer Boat builders, owners, and admirers share their ideas, experiences, and watery hi-jinx.

If you are new to this blog, start at the beginning by selecting the oldest date in the blog archive located in the left-hand column. Enjoy!

Sunday, December 16, 2012

October 2012: Boat Wheels, pt. 3

Before I could launch my Skiff, I needed to sort out the trailer it would ride upon for the 450+ mile round trip ride to its birth waters.  In previous posts, I've shown some details about the trailer itself but I had yet to make the support system that would secure the boat to the trailer.  Because the hull is so lightweight, my concern was that it would easily separate from the trailer on hard bumps, or crosswinds.  My only other experience with boat trailers is my dad's 21-ft powerboat which weighs thousands of pounds.

I decided early on that for the long haul to Vermont I would flip the boat over, allowing the hull bottom to act as a more aerodynamic shape.  This meant fitting the bunks to match the boat's gunwales.


The designer has recommended that the hull should be supported as near the bulkheads as possible.  This is the strongest part of the hull and should prevent any problem with perforating the relatively thin plywood skin of the hull.

With the distance between bunks sorted out, I placed them on the frame to determine where they could be bolted down.  The trailer is longer than most this size, but I still had precious little room to work with.  Placing the rear bunk at the very back end of frame meant the bow stem of the hull would not clear the winch post of the trailer.  Good thing the post is bolted--not welded--to the frame.


After making some adjustments, I secured the bunks with galvanized hardware and added foam to protect my pride and joy.  The keen observer will notice small blue markers indicating the bulkhead position.  This helped the two manual laborers (me and my wife) place the hull in its correct position quickly.


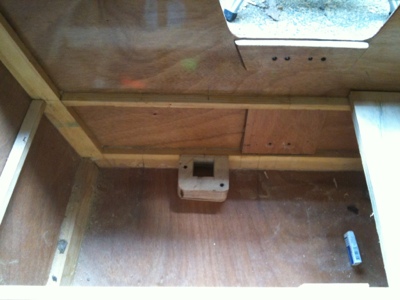
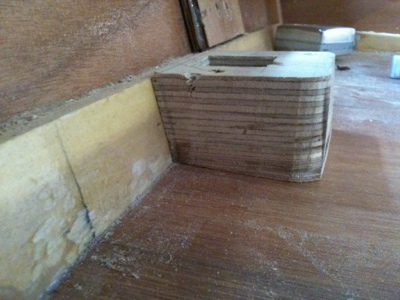
That's when I noticed how close a fit there was at the bow's tip.  There was maybe a half an inch (13mm) of clearance and I'm sure the whole system has more than a half an inch of play in it.  The picture below shows a bit of foam padding, but I knew that would not be the solution.


 The solution ended up being to raise the front bunk off the frame a bit more and it was my brother (who had arrived for the transport and found me still trying to solve this dilemma) who came up with the idea for shims.  I had enough hardwood pieces that fit nicely and the fix was in.  This should only be a semi-permanent solution because I have other plans for the bunks which I'll describe later.


Below is proof that the shims did the job.  The first pic was taken at a highway rest stop after 40 miles of driving.  The second is at the destination, 226 miles from the start (about 4 hours of driving). 


Observations:  
--The suspension did a great job of absorbing the rough stuff without bouncing like a ball.  My brother tells a horror story of towing a Sunfish (close to the weight of the GIS) on a Trailex aluminum trailer (a very popular product) and seeing in his rearview mirror the boat getting airborne, throwing moves like a snowboarder.  The Goat was far more mature.
--The overall weight is laughable and could easily be pulled by my compact 4-cylinder Ford Focus hatchback.  I'm not sure that I ever do that now that I have The ManVan in the fleet.  But you never know.
--I'm happy with the balance fore-and-aft.  The hull's center of gravity is forward of the trailer's axle, but not excessively so that would place a great load on the hitch (i.e. tongue weight).  Likewise, the hull doesn't extend too far back.  I have seen photos of some GIS trailers that worry me (including one on the roof of a very small car).
--There is enough flex in the frame that the bunk shims were necessary.  It is what it is, but my future plans will help remedy that.

Future plans:
--I wired the lighting to include a plug at the rear to accommodate a transom light bar.  I have the additional lights and wiring, so if I weren't typing this post, I could be making the light bar.  My idea is to have a clamp system that would fit through the tiller cutout.  I'd like the clamp to rotate relative to the light bar to accommodate the different transom angles, upright versus inverted.
--Speaking of upright, I plan to notch the bunks between the current gunwale notches to secure the boat in an upright orientation.  This will allow me to launch directly off the trailer which is the only way I'll be able to sail single handed (like many men, I'm allergic to asking for help).
--Although I was able to lash the mast to my van's roof and stuff the spars inside the cabin (just barely), that's not how I want to do it.  I plan to make spar storage tubes that will tuck under the hull.  I've looked into actual tubes, plastic drainage pipes, but the cost is not reasonable.  Instead I will build 16-foot long boxes (or a single divided box) that will run the length of the trailer.  I think they could add stiffness to the frame and will certainly raise the hull from the frame reducing the risk of hull-to-frame contact.  The box-tubes will have holes for drainage and ventilation and to allow for flooding during ramp launches.  They could also sprout other storage compartments for rigging, gear, etc.
--I wouldn't mind replacing the 8-inch wheels with 12-inch wheels, which are better suited to long distance hauls.  It's not a high priority, but if these tire catch a flat I'll spend the extra for the upgrade.
--I also plan to show this trailer to the gentleman that built it.  I think he'll be happy to know that a fellow wooden boat builder is putting it to good use.

Stay tuned for more Goat tales...

Thursday, December 13, 2012

May-June 2012: Mizzen Support Structure


I decided to lay the foundations for the mizzen mast in advance, even though I won't be making the mizzen mast and sail for awhile.  THis way, all I have to do a punch a hole in the aft deck and the hull is ready and waiting for Yawl-ness.

Early version of step, later reduced in size

Stringer changed to lateral span,
will accommodate possible future storage locker
Partner aligned over step.
Final assembly brought it flush with seat cleat it's shown resting on here.
Much more compact step.  Mast contact point reinforced with fiberglass.
Wedged base compensates for slope of hull.

Mock boomkin.  Having seen John Goodman's boomkin mount break, I intend to distribute the load ove a much broader area with two mounting points.
Mast-eye's-view.  Mizzen mast will be hollow box construction like the main.
More mock boomkin action.  
I will secure the boomkin with two brackets, one close to the forward stringer and a taller one near the transom.  The height difference will provide the rising angle envisioned by Clint Chase, which is both needed to avoid contact with the water and desired for aesthetic balance.  This plan also removes the transom from any load bearing duties so I should not have to add reinforcement to it's face.

I hope the designer will appreciate my attempt to reduce weight.


Sadly, I did not capture any images of the mast box that will seal the aft buoyancy chamber.  It is essentially the same method that I used up front: four side of ply with filleting mix in the corners.  I did a seal test by plugging the drain hole (not seen here but it runs from the step through the transom frame and and out the stern) and filling the mast box with water.  It didn't hold at first so I added more filleting 'til I got it right.  All this is now hidden under the aft deck.

May 2012: Mast Partners, Yawl Style

Here are some details of how I installed the mast partners, particularly how I added the Yawl version partner.


Wednesday, December 12, 2012

Embargo lifted

Dear Reader,

I have been intentionally NOT keeping up with this blog the second half of this year because I really felt like it was distracting me from actually building a boat.  With the build mostly done, and the first float accomplished, I will get back to the task of sharing my experience and offering tips on building the Goat Island Skiff.

Another obstacle was the loss of my image hosting service.  No pictures were "lost" because they all reside on my home computer, but the thought of going back to each and every blog page and uploading several pics per page was daunting.  I've done it.  Now I can add new pics without the nagging voice in my head reminding me of all the missing images.

That said, there are a bunch of steps I skipped over that I'll be adding in the comings days/weeks/months; I really want the full chronicle captured.  With any luck, I'll have that all done before I start creating new tales to tell about mizzen masts, super booms, or Goat Gatherings.  While I'm at it, I may also add epilogue comments to older posts just to clarify or correct or confirm what I might have said back then.

Thanks for stopping by!